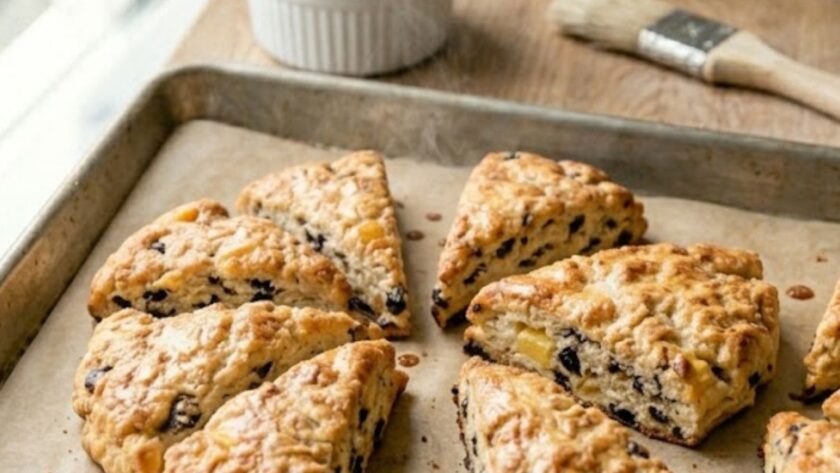
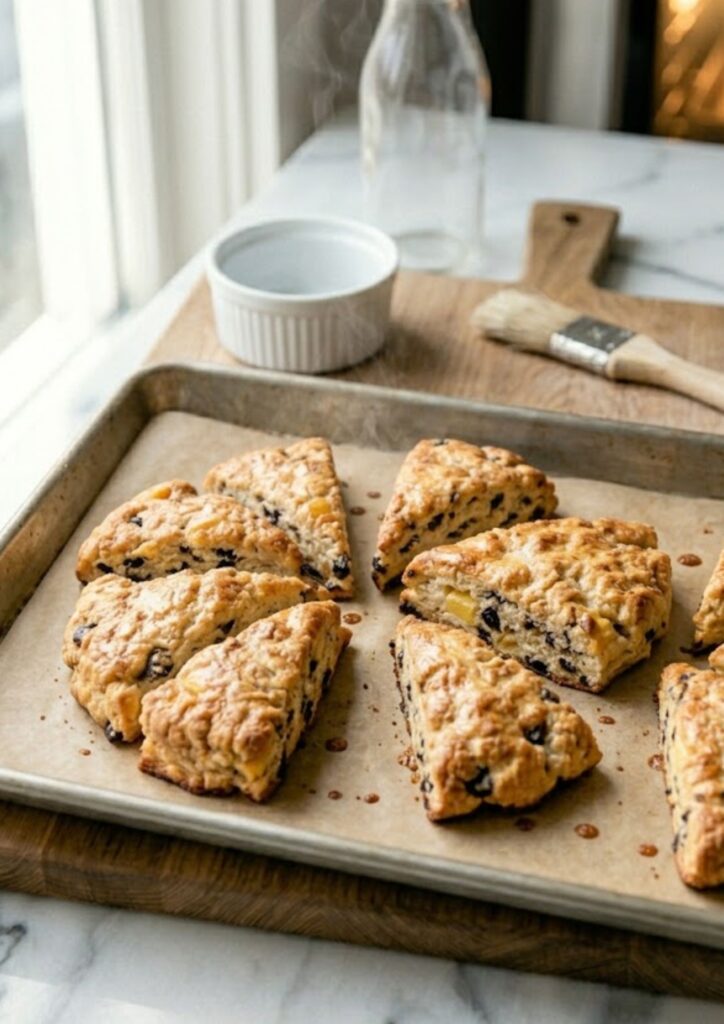
Ina Garten’s Buttermilk Scones are the gold standard for a “Hamptons-style” breakfast. These aren’t the dry, rock-hard wedges you find in coffee shop display cases; they are light, flaky, and tender, thanks to a high butter-to-flour ratio and the acidity of the buttermilk.
Approach E: Most people make the mistake of treating scone dough like bread dough, but Ina’s secret is “benign neglect.” The less you touch the dough, the better the scones will be. I’ve found that using your fingertips to rub in the butter—rather than a food processor—keeps the fat in distinct little chunks. When those chunks hit the 200°C oven, they steam and create those gorgeous, laminated layers that make a scone truly elite.
The baking soda and buttermilk are doing more work than you’d think here. While the baking powder provides the lift, the reaction between the acidic buttermilk and the alkaline baking soda creates tiny air bubbles that ensure the crumb stays soft instead of dense. I love serving these warm with a thick layer of salted butter and some bitter orange marmalade—it’s the ultimate Sunday morning luxury.
Ina Garten Buttermilk Scones Ingredients
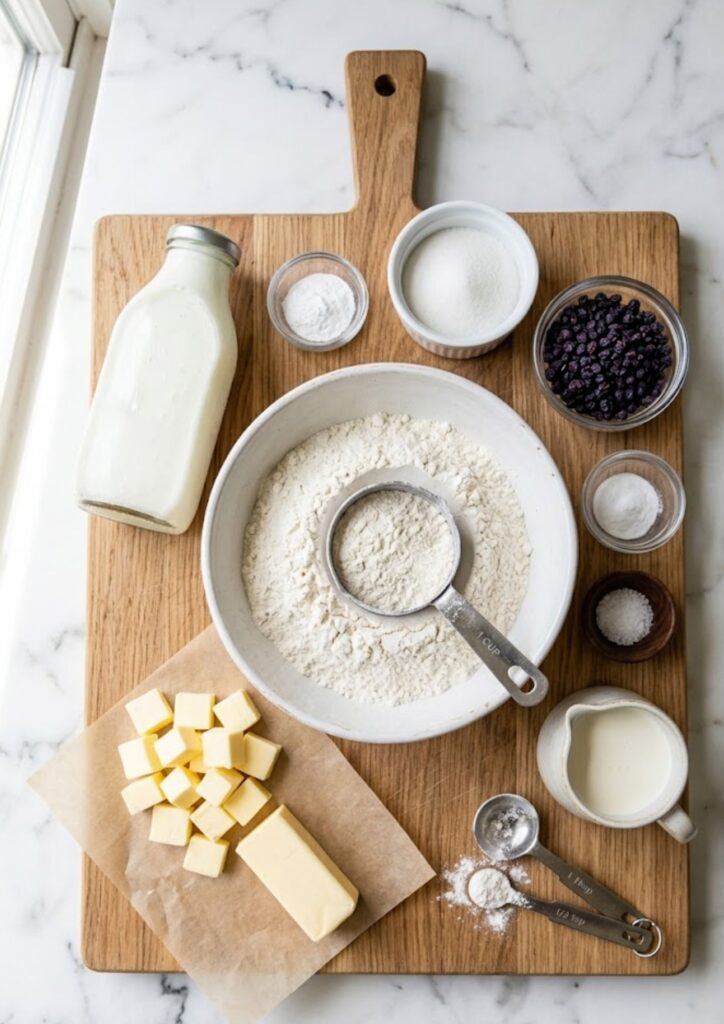
- 3 cups (375g) all-purpose flour
- 1/3 cup (65g) granulated sugar
- 1 tsp salt
- 2 1/2 tsp baking powder
- 1/2 tsp baking soda
- 3/4 cup (170g) cold unsalted butter (1 1/2 sticks)
- 1 cup (240ml) cold buttermilk
- 1/2 cup (75g) currants (optional)
- 1 tbsp heavy cream (for brushing the tops)
How To Make Ina Garten Buttermilk Scones
- 1. Preheat the Oven: Start by preheating your oven to 200°C (400°F). A hot oven is crucial for that immediate “spring” that makes scones tall and light.
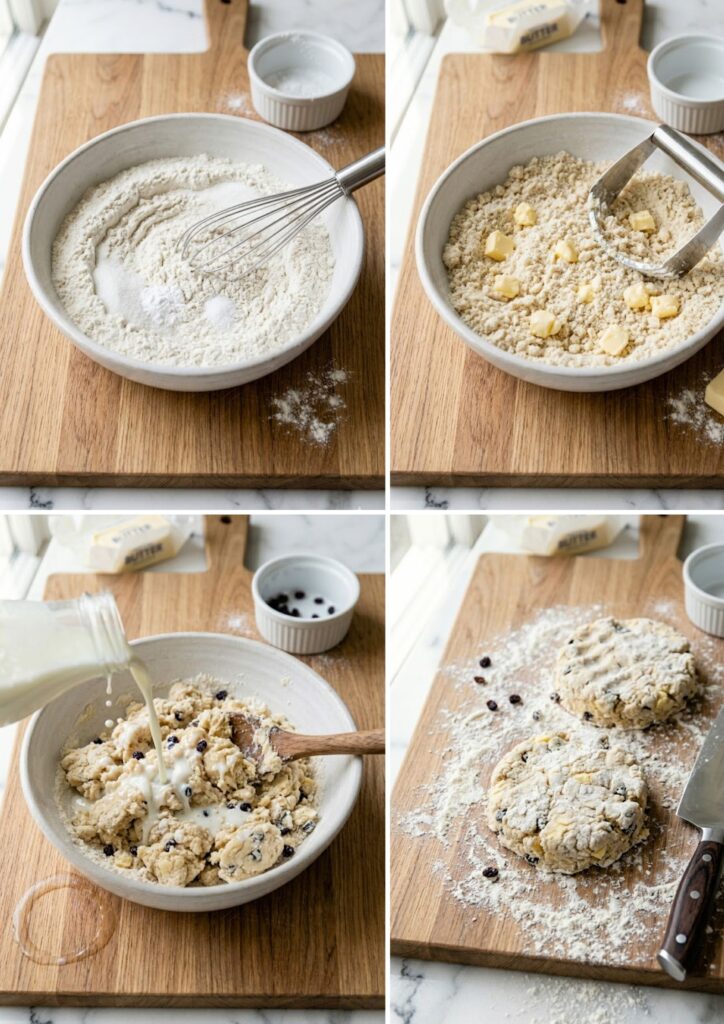
- 2. Combine Dry Ingredients: In a large bowl, whisk together the flour, sugar, salt, baking powder, and baking soda.
- 3. Cut in the Butter: Dice the cold butter into small cubes. Toss them into the flour and use your fingertips (or a pastry cutter) to rub the butter into the flour. Stop when the mixture looks like coarse crumbs with some pea-sized bits of butter still visible.
- 4. Add Liquid: Pour in the cold buttermilk. Stir gently with a fork just until the dough starts to clump together. If using currants, fold them in now. Stop mixing the second the white streaks of flour disappear.
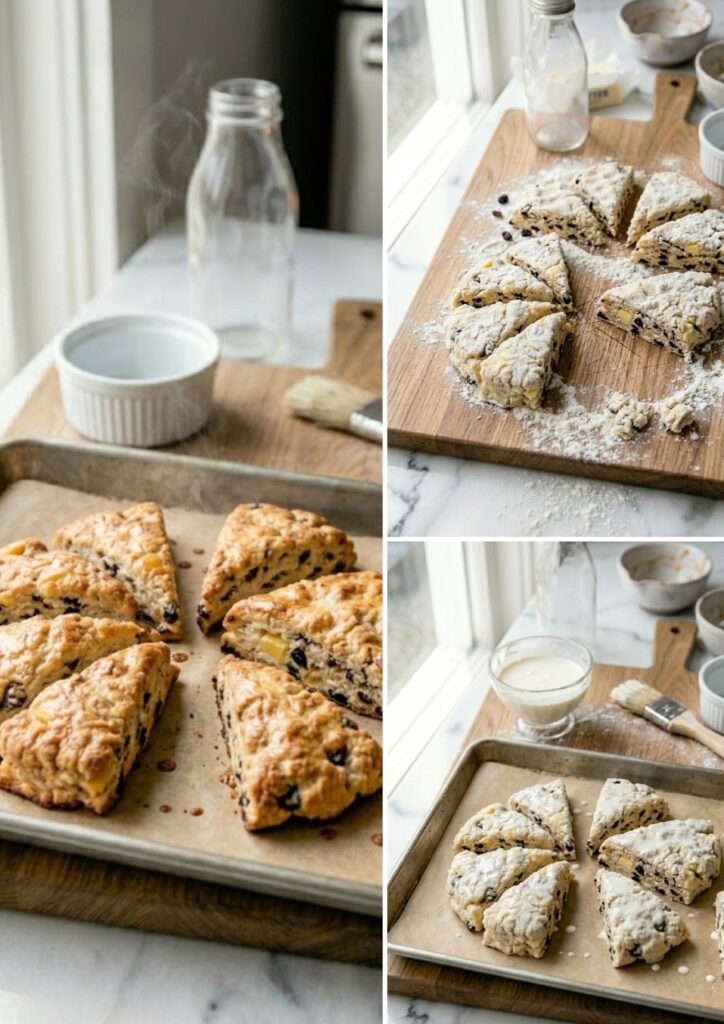
- 5. Shape and Cut: Turn the shaggy dough onto a well-floured surface. Divide it in half. Pat each half into a circle about 3/4-inch (2cm) thick. Cut each circle into 8 wedges (like a pizza).
- 6. Prep for Baking: Place the wedges on a baking sheet lined with parchment paper. Leave about an inch of space between them. Lightly brush the tops with the heavy cream.
- 7. Bake: Bake for 15 minutes or until the tops are golden brown and the bottoms are toasted. Let them cool for 5 minutes before serving.
Recipe Tips
- Keep it Cold: This is the most important rule. Cold butter and cold buttermilk are what create the steam for flakiness. If your kitchen is hot, put the flour/butter mixture in the fridge for 10 minutes before adding the buttermilk.
- The “Lighter” Touch: When patting the dough into circles, don’t use a rolling pin. Use your hands to gently press it out so you don’t crush the air pockets.
- Avoid the “Tough” Scone: If you overwork the dough, you develop the gluten, which turns your scone into a hockey puck. A shaggy, slightly messy-looking dough is a good sign!
- Measurement Accuracy: If you don’t have a scale, use the “spoon and level” method for your flour. Dipping the cup directly into the bag packs the flour down and leads to a dry scone.
What To Serve With Ina Garten Buttermilk Scones
- Clotted Cream & Jam: The traditional British way. Raspberry or strawberry preserves are the classic choice.
- Salted Butter and Marmalade: Ina’s preferred way to enjoy them, balancing the sweetness with a bit of citrus pith.
- Lemon Curd: A bright, zesty topping that pairs beautifully with the buttery dough.

How To Store Ina Garten Buttermilk Scones
- Countertop: Scones are best eaten the day they are made. You can keep them in an airtight container for 2 days, but they will lose their crisp exterior.
- Freezer: You can freeze the unbaked wedges! Bake them straight from the freezer—just add 3–5 minutes to the baking time. This is the best way to have “fresh” scones anytime.
Ina Garten Buttermilk Scones Nutrition Facts
Per serving (1 scone):
| Nutrient | Amount |
| Calories | 240 kcal |
| Total Fat | 12g |
| Carbs | 30g |
| Sugars | 6g |
| Sodium | 310mg |
FAQs
Why are my Ina Garten Buttermilk Scones flat and dense?
This usually happens if your baking powder is expired or if the butter was too warm. If the butter melts into the flour before it hits the oven, you lose those steam pockets that create lift. Keep everything fridge-cold until the last possible second.
Can I use regular milk instead of buttermilk in my Ina Garten Buttermilk Scones?
You can, but the texture won’t be as tender. Buttermilk’s acidity breaks down gluten and reacts with the baking soda to create a fluffier crumb. If you’re out of buttermilk, add 1 tablespoon of lemon juice or white vinegar to a cup of regular milk and let it sit for 5 minutes.
Do I have to use currants for Ina Garten Buttermilk Scones?
Not at all. Ina often leaves them out or swaps them for dried cranberries or even chocolate chips. If you want a savory twist, leave out the sugar and currants and add ½ cup of sharp cheddar and some chopped chives.
Why is my dough so sticky?
Buttermilk thickness varies by brand. If the dough is too wet to handle, just toss a little extra flour onto your hands and the work surface. Don’t keep adding flour to the dough itself, or you’ll end up with a dry scone.
Should I use a biscuit cutter or a knife?
A sharp knife or a bench scraper is best for Ina’s wedge-style scones. If you use a round biscuit cutter, do not twist it as you press down; twisting seals the edges of the dough and prevents the scone from rising upward.
How do I get that “bakery glow” on top?
The heavy cream wash is the secret. For an even crunchier, professional finish, sprinkle a little “sanding sugar” or granulated sugar over the cream before you slide the tray into the oven.
Try More Recipes:

Ina Garten Buttermilk Scones
Description
Ina Garten’s Buttermilk Scones are the gold standard for a luxurious, Hamptons-style breakfast. By using a light touch to cut cold butter into the dry ingredients and letting the acidity of cold buttermilk react with baking soda, you achieve an incredibly tender, beautifully laminated crumb rather than a dense, dry wedge. Baked until perfectly golden and boasting distinct, flaky layers, these scones are the ultimate weekend indulgence when served warm with salted butter and marmalade.
Ingredients
Instructions
- Preheat the Oven: Start by preheating your oven to 200°C (400°F). A hot oven is crucial for that immediate “spring” that makes scones tall and light.
- Combine Dry Ingredients: In a large bowl, whisk together the flour, sugar, salt, baking powder, and baking soda.
- Cut in the Butter: Dice the cold butter into small cubes. Toss them into the flour and use your fingertips (or a pastry cutter) to rub the butter into the flour. Stop when the mixture looks like coarse crumbs with some pea-sized bits of butter still visible.
- Add Liquid: Pour in the cold buttermilk. Stir gently with a fork just until the dough starts to clump together. If using currants, fold them in now. Stop mixing the second the white streaks of flour disappear.
- Shape and Cut: Turn the shaggy dough onto a well-floured surface. Divide it in half. Pat each half into a circle about 3/4-inch (2cm) thick. Cut each circle into 8 wedges (like a pizza).
- Prep for Baking: Place the wedges on a baking sheet lined with parchment paper. Leave about an inch of space between them. Lightly brush the tops with the heavy cream.
- Bake: Bake for 15 minutes or until the tops are golden brown and the bottoms are toasted. Let them cool for 5 minutes before serving.
Notes
-
Keep it Cold: This is the most important rule. Cold butter and cold buttermilk are what create the steam for flakiness. If your kitchen is hot, put the flour/butter mixture in the fridge for 10 minutes before adding the buttermilk.
The “Lighter” Touch: When patting the dough into circles, don’t use a rolling pin. Use your hands to gently press it out so you don’t crush the air pockets.
Avoid the “Tough” Scone: If you overwork the dough, you develop the gluten, which turns your scone into a hockey puck. A shaggy, slightly messy-looking dough is a good sign!
Measurement Accuracy: If you don’t have a scale, use the “spoon and level” method for your flour. Dipping the cup directly into the bag packs the flour down and leads to a dry scone.