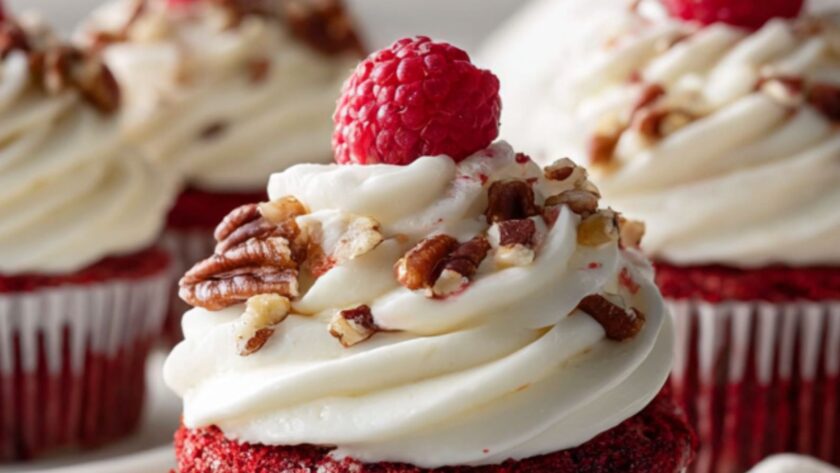
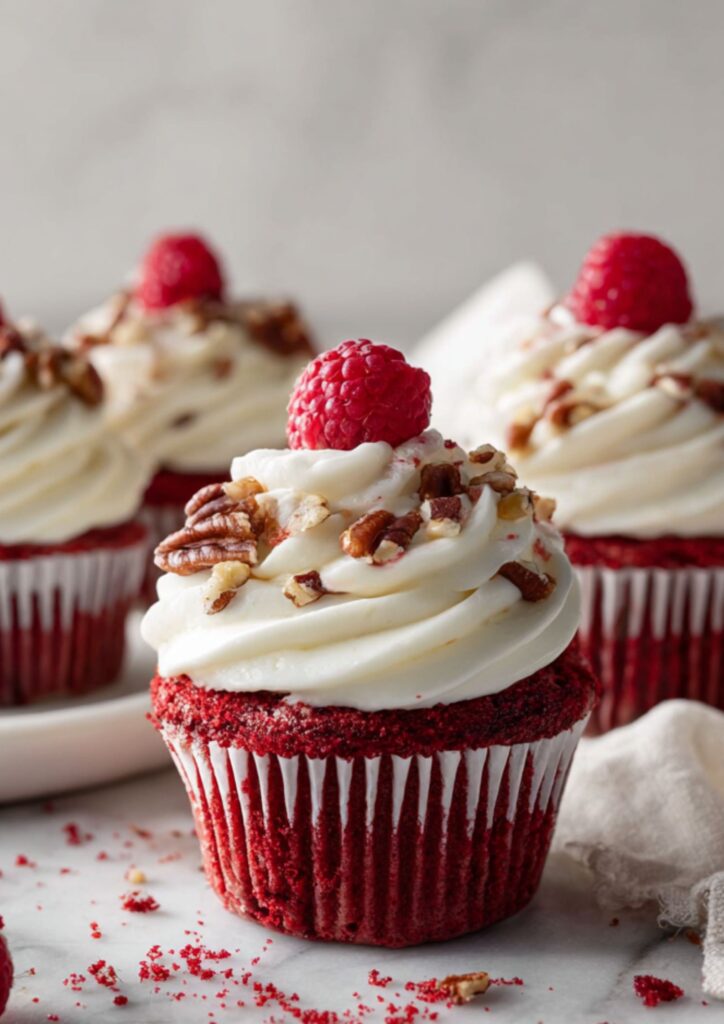
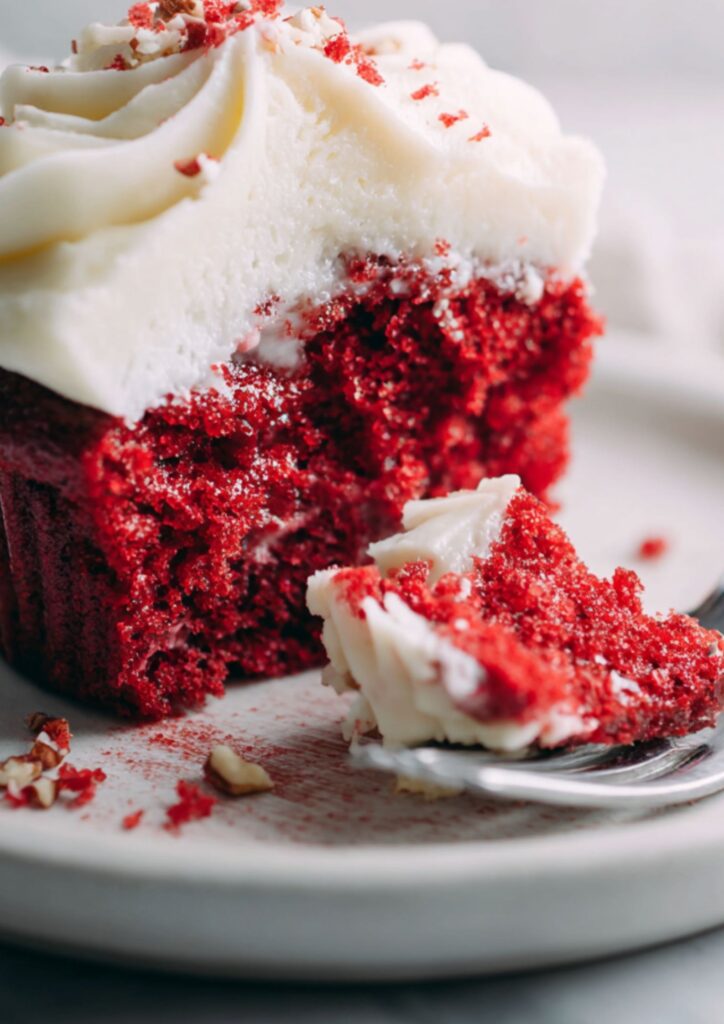
Paula Deen Red Velvet Cupcakes are a classic Southern dessert featuring a hint of cocoa and bright red color. These soft cakes are piled high with a heavy cream cheese frosting and topped with crunchy pecans and raspberries.
If you do nothing else, make sure your eggs and buttermilk are truly at room temperature. That’s the difference between a smooth, silky batter and one that looks curdled and broken. I’ve found that cold dairy won’t bond with the vegetable oil properly, which leaves you with a greasy cupcake that has a tight, rubbery texture instead of a light crumb.
The white vinegar is doing more work than you’d think here. Without it, the baking soda won’t have enough acid to react, and your cupcakes will stay flat and dense. I didn’t expect the tiny bit of cocoa powder to matter that much, but it provides just enough depth to keep the sugar from being overwhelming. These are my absolute favorite for bake sales because they stay moist for days thanks to the high oil content.
Paula Deen Red Velvet Cupcakes Ingredients
For the Cupcakes:
- 2 1/2 cups (300g) all-purpose flour
- 1 1/2 cups (300g) sugar
- 1 teaspoon baking soda
- 1 teaspoon salt
- 1 tablespoon cocoa powder
- 1 1/4 cups (300ml) vegetable oil
- 1 cup (240ml) buttermilk, at room temperature
- 2 large eggs, at room temperature
- 2 tablespoons red food coloring
- 1 teaspoon white distilled vinegar
For the Cream Cheese Frosting:
- 1 pound (450g) cream cheese, softened
- 2 sticks (225g) butter, softened
- 1 teaspoon vanilla extract
- 4 cups (480g) confectioners’ sugar, sifted
For Garnish:
- 1/2 cup (60g) pecans, chopped
- 1 cup (125g) fresh raspberries

How To Make Paula Deen Red Velvet Cupcakes
- 1. Heat the oven: Set your oven rack to the middle position and preheat to 350°F (175°C). Line two standard cupcake pans with paper liners so you’re ready to go as soon as the batter is mixed.
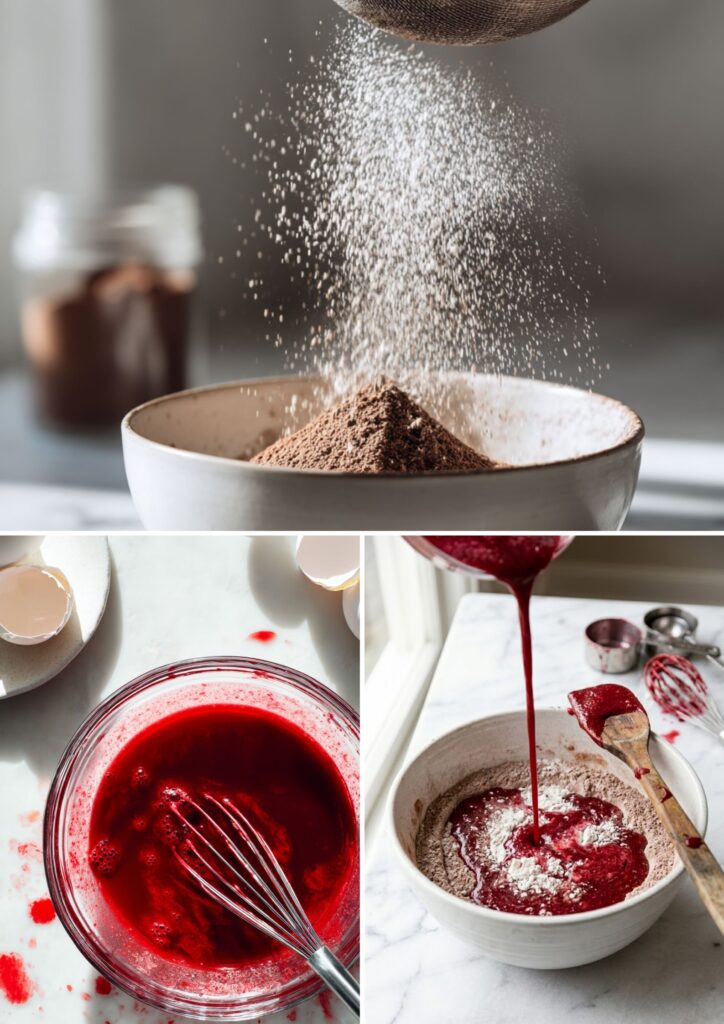
- 2. Sift the dry goods: Place a fine mesh strainer over a large bowl and pour in the flour, sugar, baking soda, salt, and cocoa powder. Shake the strainer until everything falls through, then whisk it briefly to make sure the cocoa is spread evenly.
- 3. Mix the wet parts: In a separate medium bowl, whisk together the vegetable oil, buttermilk, eggs, food coloring, and vinegar. Keep whisking until the red color is solid and there aren’t any yellow streaks left from the eggs.
- 4. Combine the batter: Slowly pour the red liquid into the bowl with the flour mixture. Use a large spoon or a whisk to fold them together until the white flour disappears and the batter is smooth.
Don’t overwork the mixture at this stage. If you keep stirring after the flour is mixed in, you’ll develop too much gluten and the cupcakes will come out tough like bread rather than soft like cake.
- 5. Fill the liners: Use a large scoop to fill each cupcake paper about two-thirds of the way up. If you fill them to the top, the batter will spill over the edges and create a messy, flat top that’s hard to frost.
- 6. Bake and rotate: Slide the pans into the oven and bake for about 20 to 22 minutes. Halfway through the time, turn the pans around 180 degrees so the cupcakes in the back of the oven move to the front.
Turning the pans is the best way to deal with hot spots in your oven. It makes sure every single cupcake rises to the same height and doesn’t get burnt on just one side.
- 7. Test for doneness: Poke a toothpick into the center of a cupcake; it should come out clean or with just a few dry crumbs. Take them out of the oven and let them sit in the pan for 5 minutes before moving them to a wire rack.
- 8. Make the frosting: Beat the softened cream cheese and butter together in a stand mixer until the mixture is white and fluffy. Add the vanilla, then slowly mix in the confectioners’ sugar one cup at a time until it’s thick and smooth.
- 9. Frost and decorate: Once the cupcakes are cold to the touch, pipe or spread a thick layer of frosting on each one. Press a few chopped pecans into the sides and place a fresh raspberry right in the middle of the swirl.
Recipe Tips
- Use gel food coloring: While the recipe calls for two tablespoons of standard liquid coloring, you can use a teaspoon of gel for a much more vibrant red. The liquid kind adds a lot of extra moisture that can sometimes make the cake feel a bit sticky.
- Check your baking soda: Since this recipe relies on the reaction between vinegar and soda for lift, your soda must be fresh. Drop a pinch into a spoonful of vinegar; if it doesn’t fizz up immediately, throw the box away and buy a new one.
- Beat the frosting longer: When you think the cream cheese frosting is done, beat it for another two minutes on high. This incorporates more air and makes it much easier to pipe beautiful swirls that don’t sag under their own weight.
- Don’t skip the sifting: Cocoa powder is notorious for having tiny, hard lumps that won’t break down in the batter. If you don’t sift it with the flour, you’ll find bitter dark spots inside your bright red cupcakes.
- Cool them on a rack: Never leave the cupcakes to cool entirely in the metal pan. The heat from the metal will keep cooking the bottoms, which can lead to a dry, overbaked crust instead of a soft base.
- Wait for the chill: If you frost these even while they’re slightly warm, the high fat content in the cream cheese will cause the frosting to melt. The cupcakes should feel actually cold to the back of your hand before you start decorating.

What To Serve With Paula Deen Red Velvet Cupcakes
A cold glass of milk or a hot cup of black coffee is the best way to enjoy these. The bitterness of the coffee helps cut through the very sweet and tangy cream cheese frosting.
If you’re serving these at a party, a bowl of extra raspberries or some dark chocolate shavings on the side works well. These cupcakes are quite rich, so you don’t need anything heavy like ice cream to go with them.
Storing & Reheating Tips
- Fridge: Keep these in an airtight container in the fridge for up to 4 days. Because the frosting has real cream cheese and butter, they shouldn’t sit out at room temperature for more than 2 hours.
- Freeze: You can freeze the unfrosted cupcakes for up to two months if you wrap them tightly in plastic. I don’t recommend freezing the frosted ones because the cream cheese can get a grainy texture once it thaws out.
- Reheat: These are best eaten cold or at room temperature. If you prefer them softer, take them out of the fridge 30 minutes before eating so the butter in the frosting has time to relax.
Paula Deen Red Velvet Cupcakes Nutrition Facts
Per serving (1 of 24):
- Calories: 410 kcal
- Protein: 4g
- Fat: 22g
- Carbohydrates: 51g
- Sugar: 38g
- Sodium: 260mg
FAQs
Can I use a different oil for Paula Deen Red Velvet Cupcakes?
Yes, you can use any neutral-tasting oil like canola or sunflower oil. Avoid using olive oil or coconut oil because the strong flavors will interfere with the cocoa and vanilla in the batter.
Why did my cupcakes turn out brown instead of red?
This usually happens if you used too much cocoa powder or if your food coloring wasn’t strong enough. The small amount of cocoa is just for flavor; if you add more, it will overpower the red dye and leave the cakes looking muddy.
How do I stop the frosting from being too runny?
Make sure your butter and cream cheese are soft but not melted. If the room is warm and the frosting feels soft, put the bowl in the fridge for 15 minutes to firm it up before you try to pipe it.
Can I make Paula Deen Red Velvet Cupcakes without buttermilk?
No, the buttermilk is a critical part of the chemical reaction with the baking soda. If you don’t have it, you can make a quick version by adding a tablespoon of lemon juice to a cup of regular milk and letting it sit for five minutes.
What is the best way to fill the liners evenly?
Use a standard-sized spring-loaded ice cream scoop. This gives you exactly the same amount of batter for every cupcake so they all finish baking at the exact same time.
Check out More Recipes:

Paula Deen Red Velvet Cupcakes
Description
Paula Deen Red Velvet Cupcakes are a classic Southern indulgence, prized for their striking crimson color and tender, velvety crumb. The recipe uses a traditional combination of buttermilk, vinegar, and a touch of cocoa powder to create a subtle tang and a light texture. Topped with a rich, pipeable cream cheese frosting, these cupcakes are traditionally finished with a crunch of pecans and a fresh raspberry, offering a perfect balance of sweet, tart, and creamy flavors in every bite.
Ingredients
For the Cupcakes:
For the Cream Cheese Frosting:
For Garnish:
Instructions
- Heat the oven: Set your oven rack to the middle position and preheat to 350°F (175°C). Line two standard cupcake pans with paper liners so you’re ready to go as soon as the batter is mixed.
- Sift the dry goods: Place a fine mesh strainer over a large bowl and pour in the flour, sugar, baking soda, salt, and cocoa powder. Shake the strainer until everything falls through, then whisk it briefly to make sure the cocoa is spread evenly.
- Mix the wet parts: In a separate medium bowl, whisk together the vegetable oil, buttermilk, eggs, food coloring, and vinegar. Keep whisking until the red color is solid and there aren’t any yellow streaks left from the eggs.
- Combine the batter: Slowly pour the red liquid into the bowl with the flour mixture. Use a large spoon or a whisk to fold them together until the white flour disappears and the batter is smooth.
- Fill the liners: Use a large scoop to fill each cupcake paper about two-thirds of the way up. If you fill them to the top, the batter will spill over the edges and create a messy, flat top that’s hard to frost.
- Bake and rotate: Slide the pans into the oven and bake for about 20 to 22 minutes. Halfway through the time, turn the pans around 180 degrees so the cupcakes in the back of the oven move to the front.
- Test for doneness: Poke a toothpick into the center of a cupcake; it should come out clean or with just a few dry crumbs. Take them out of the oven and let them sit in the pan for 5 minutes before moving them to a wire rack.
- Make the frosting: Beat the softened cream cheese and butter together in a stand mixer until the mixture is white and fluffy. Add the vanilla, then slowly mix in the confectioners’ sugar one cup at a time until it’s thick and smooth.
- Frost and decorate: Once the cupcakes are cold to the touch, pipe or spread a thick layer of frosting on each one. Press a few chopped pecans into the sides and place a fresh raspberry right in the middle of the swirl.
Don’t overwork the mixture at this stage. If you keep stirring after the flour is mixed in, you’ll develop too much gluten and the cupcakes will come out tough like bread rather than soft like cake.
Turning the pans is the best way to deal with hot spots in your oven. It makes sure every single cupcake rises to the same height and doesn’t get burnt on just one side.
Notes
-
Use gel food coloring: While the recipe calls for two tablespoons of standard liquid coloring, you can use a teaspoon of gel for a much more vibrant red. The liquid kind adds a lot of extra moisture that can sometimes make the cake feel a bit sticky.
Check your baking soda: Since this recipe relies on the reaction between vinegar and soda for lift, your soda must be fresh. Drop a pinch into a spoonful of vinegar; if it doesn’t fizz up immediately, throw the box away and buy a new one.
Beat the frosting longer: When you think the cream cheese frosting is done, beat it for another two minutes on high. This incorporates more air and makes it much easier to pipe beautiful swirls that don’t sag under their own weight.
Don’t skip the sifting: Cocoa powder is notorious for having tiny, hard lumps that won’t break down in the batter. If you don’t sift it with the flour, you’ll find bitter dark spots inside your bright red cupcakes.
Cool them on a rack: Never leave the cupcakes to cool entirely in the metal pan. The heat from the metal will keep cooking the bottoms, which can lead to a dry, overbaked crust instead of a soft base.
Wait for the chill: If you frost these even while they’re slightly warm, the high fat content in the cream cheese will cause the frosting to melt. The cupcakes should feel actually cold to the back of your hand before you start decorating.