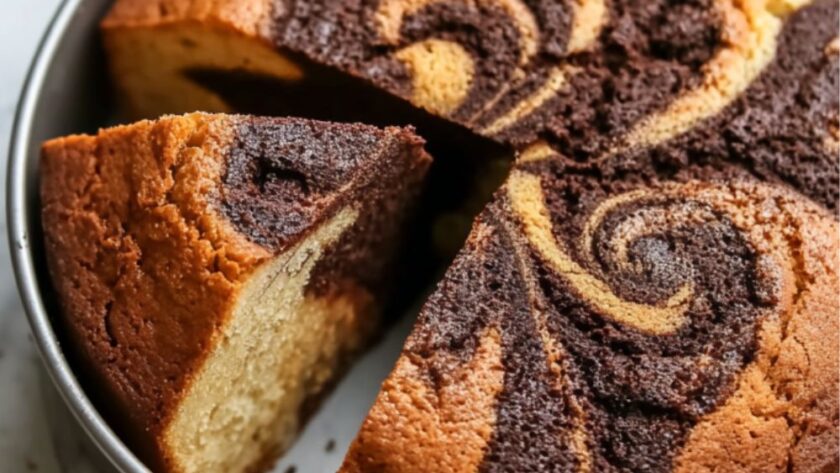
Jamie Oliver Marble Cake Recipe is a proper British teatime treat. This easy sponge uses basic pantry staples like caster sugar and self-raising flour to create a striking pattern of vanilla and chocolate swirls.
If you do nothing else, leave the butter out on the side until it’s completely soft. That’s the difference between a smooth batter that pours easily and a lumpy mess that won’t marble correctly when you swirl it.
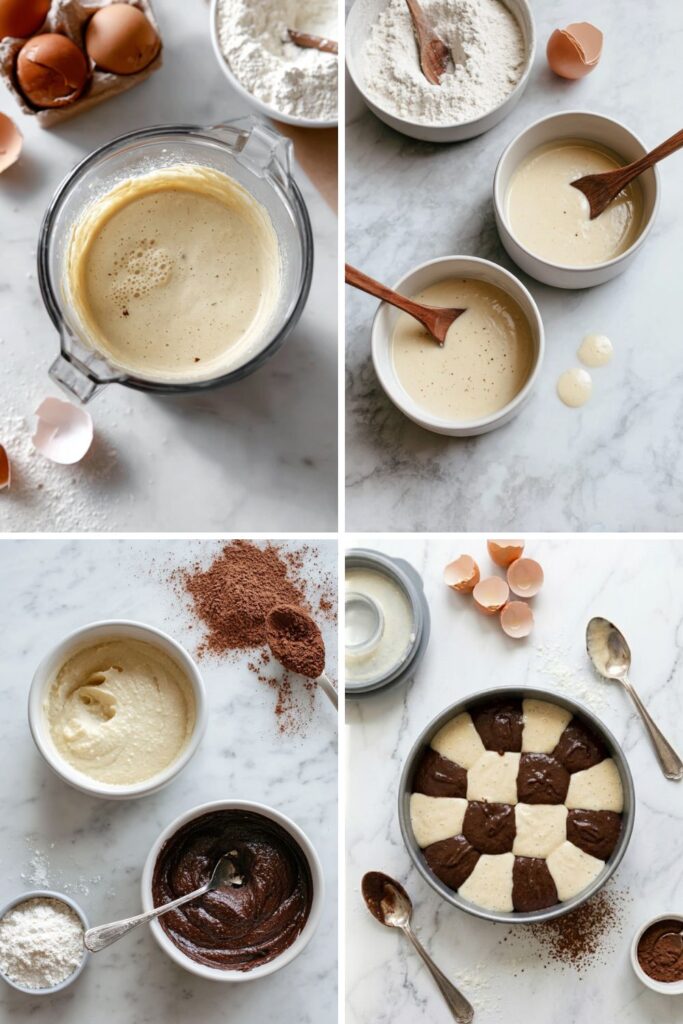
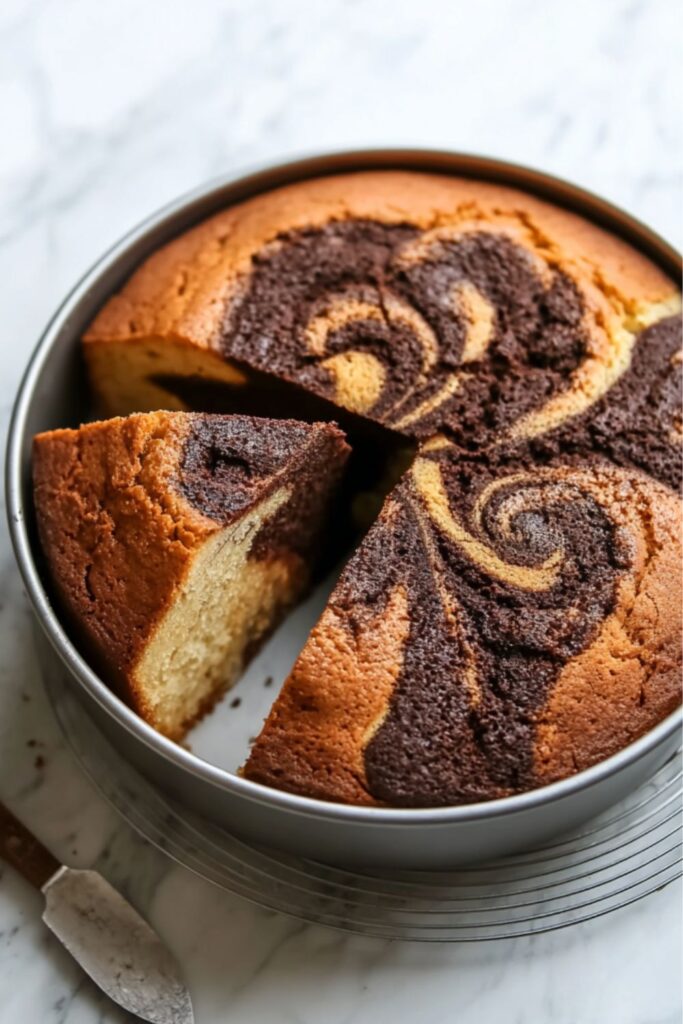
The blender is doing more work than you’d think here by aerating the eggs and flour in seconds. Most recipes make you cream everything by hand, but this one relies on high speed to keep the crumb light and bouncy. I’ve made this for several school bake sales and it’s always the first thing to go because the pattern looks so professional.
Jamie Oliver Marble Cake Recipe Ingredients
- 225g butter, softened
- 225g caster sugar
- 4 large eggs
- 225g self-raising flour
- 3 tbsp milk
- 1 tsp vanilla extract
- 2 tbsp cocoa powder

How To Make Jamie Oliver Marble Cake Recipe
- 1. Prep the oven and tin: Heat your oven to 180°C (350°F) or 160°C if you’re using a fan setting. Grease a 20cm round cake tin with a little extra butter and line the base with a circle of baking paper so the sponge doesn’t stick.
- 2. Whizz the batter: Put the softened butter, sugar, eggs, flour, milk, and vanilla into a blender and pulse until the mixture is thick and smooth. If you don’t have a machine, just beat it in a bowl with a wooden spoon until you can’t see any more flour.
- 3. Split the mixture: Pour half of the pale vanilla batter into a second bowl so you have two equal portions to work with. Having them in separate bowls makes it much easier to keep the colours distinct before you start the marbling.
- 4. Make it chocolate: Stir the cocoa powder into one of the bowls until the batter is a deep, dark brown colour. Make sure the powder is fully mixed in so you don’t find any dry bitter clumps when you’re eating the finished cake.
- 5. Layer the colours: Use two different spoons to drop big blobs of the vanilla and chocolate mixtures into the tin, alternating as you go. You want it to look like a chequerboard of light and dark batter sitting in the bottom of the pan.
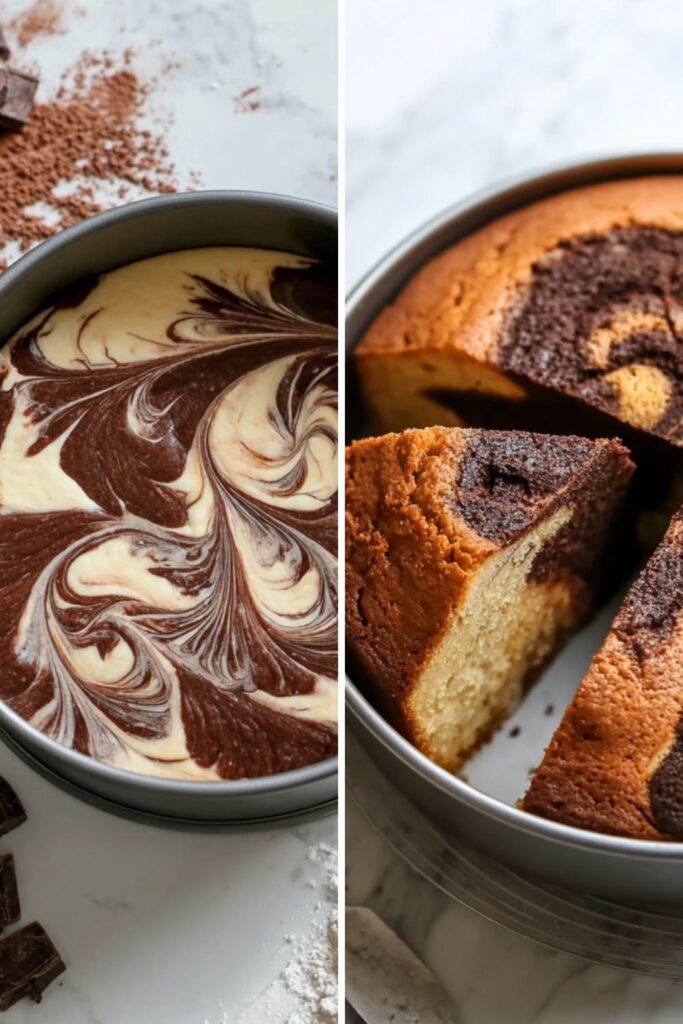
- 6. Create the swirl: Take a small skewer or a thin knife and drag it through the mixtures in a few big figure-eight shapes. Don’t overdo the swirling or the two colours will just blend into a murky brown instead of staying in clear, pretty loops.
- 7. Bake until springy: Slide the tin into the centre of the oven for 45 to 55 minutes until the top is golden and firm to the touch. Poke a skewer into the middle; if it comes out clean with no wet batter, the cake is done.
Let the cake sit in the tin for five minutes before moving it to a wire rack to finish cooling. This short rest helps the delicate sponge set so it doesn’t break apart while you’re trying to peel off the baking paper.
Recipe Tips
- Don’t over-blend the mixture: As soon as the batter looks uniform and smooth, stop the machine immediately. If you keep it running too long, you’ll knock the air out of the self-raising flour and the cake will come out flat and tough.
- Sieve the cocoa powder: Cocoa often has hard little lumps that won’t break down just by stirring. Passing it through a fine mesh sieve before adding it to the batter ensures the chocolate half of your cake is perfectly velvety.
- Use room temperature eggs: Cold eggs can cause the softened butter to curdle and separate when you blend them together. Taking them out of the fridge an hour early helps the fat and liquid stay bonded for a better rise.
- Keep the swirls large: It’s tempting to keep drawing patterns with your knife, but three or four quick passes are usually enough. The more you move the batter, the less the vanilla and chocolate will stand out from each other.
- Check the oven seal: If your cake is taking much longer than 55 minutes, your oven might be losing heat. Make sure the door is shut tight and avoid opening it during the first half hour of baking to keep the temperature steady.
- Weight your ingredients: Using a digital scale is much more accurate than using cups for a sponge like this. Even a few extra grams of flour can make the cake dry, so stick to the metric weights for the best result.
What To Serve With Marble Cake
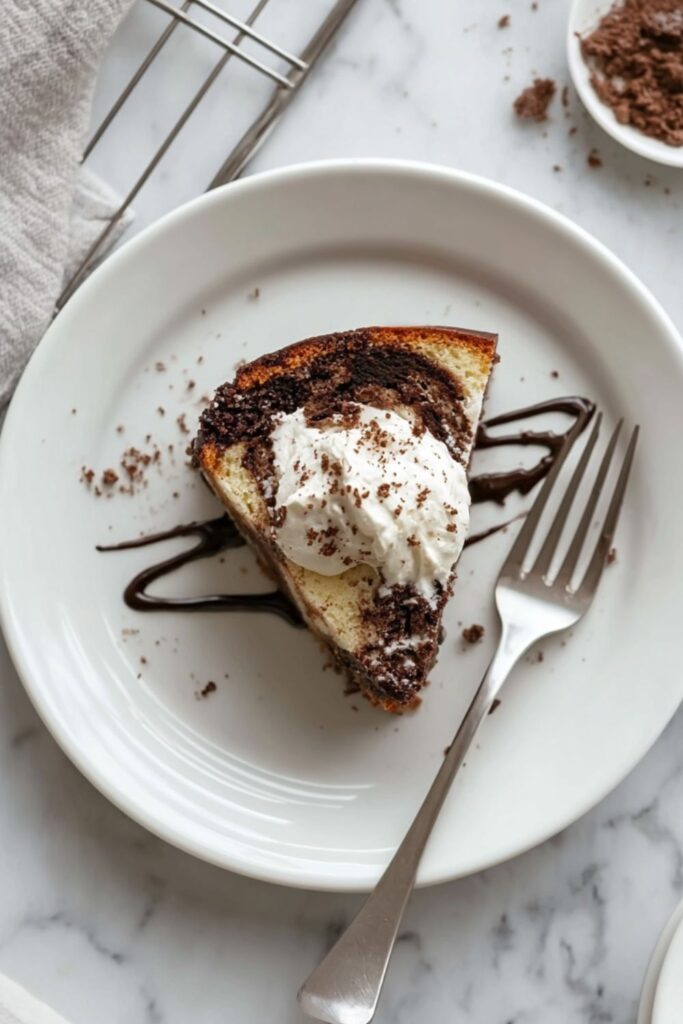
A warm slice of this is brilliant with a hot cup of tea or a big glass of cold milk. The simple flavours make it a great afternoon snack that isn’t too heavy.
If you’re serving this for dessert, a dollop of double cream or a scoop of vanilla bean ice cream works well. You could even drizzle a little melted chocolate over the top if you want to make it look a bit more fancy.
How To Store Marble Cake
- Fridge: Keep the cake in an airtight tin at room temperature for up to 4 days. You don’t actually need to put it in the fridge as the cold air can make the sponge go stale faster.
- Reheat: This cake is best at room temperature, but you can give a single slice ten seconds in the microwave if you like it warm. Don’t go any longer or the sugar will get too hot and make the bread go hard.
- Freeze: You can freeze the whole cake or individual slices by wrapping them tightly in cling film and then a layer of foil. It will stay good for up to 2 months, then just let it defrost on the counter for a few hours.
Jamie Oliver Marble Cake Recipe Nutrition Facts
Per serving (1 of 10):
- Calories: 380 kcal
- Protein: 5g
- Fat: 21g
- Carbohydrates: 44g
- Sugar: 25g
- Sodium: 180mg
FAQs
Why didn’t my Jamie Oliver Marble Cake Recipe swirl properly?
You probably moved the knife or skewer around too many times which mixed the colours together completely. Next time, just do two or three big loops through the batter and leave it alone to bake.
Can I use plain flour instead?
No, you need the leavening agents in the self-raising flour to give the cake its height. If you only have plain flour, you’ll need to mix in two teaspoons of baking powder to get the same effect.
My Marble Cake is dry, what happened?
The oven might have been too hot or the cake stayed in for a few minutes too long. Every oven is different, so start checking with a skewer at the 40-minute mark to see if it’s already done.
Can I add chocolate chips to this Jamie Oliver Marble Cake Recipe?
Yes, you can gently mix a handful of chips into the batter right before you pour it into the tin. They might sink to the bottom slightly, but they add a nice bit of texture to the soft sponge.
What if I don’t have a 20cm tin?
You can use a slightly larger tin, but the cake will be thinner and will bake much faster. Keep a close eye on it and start testing for doneness after about 30 minutes so it doesn’t burn.
Try More Recipes:
- Lemon And Blueberry Cake
- Fig Ricotta Cake
- Tres Leches Cake
- Peach Cake
- Vanilla Cake
- Yellow Cake Recipe

Jamie Oliver Marble Cake Recipe
Description
Jamie Oliver’s Marble Cake is a nostalgic, visually stunning, and delightfully simple sponge cake. By dividing a quick, all-in-one vanilla batter and enriching half of it with cocoa powder, you create a gorgeous, swirled two-tone effect. It is a tender, buttery bake that delivers the best of both chocolate and vanilla in every single bite, making it the ultimate companion for a hot cup of tea.
Ingredients
Instructions
- Prep the oven and tin: Heat your oven to 180°C (350°F) or 160°C if you’re using a fan setting. Grease a 20cm round cake tin with a little extra butter and line the base with a circle of baking paper so the sponge doesn’t stick.
- Whizz the batter: Put the softened butter, sugar, eggs, flour, milk, and vanilla into a blender and pulse until the mixture is thick and smooth. If you don’t have a machine, just beat it in a bowl with a wooden spoon until you can’t see any more flour.
- Split the mixture: Pour half of the pale vanilla batter into a second bowl so you have two equal portions to work with. Having them in separate bowls makes it much easier to keep the colours distinct before you start the marbling.
- Make it chocolate: Stir the cocoa powder into one of the bowls until the batter is a deep, dark brown colour. Make sure the powder is fully mixed in so you don’t find any dry bitter clumps when you’re eating the finished cake.
- Layer the colours: Use two different spoons to drop big blobs of the vanilla and chocolate mixtures into the tin, alternating as you go. You want it to look like a chequerboard of light and dark batter sitting in the bottom of the pan.
- Create the swirl: Take a small skewer or a thin knife and drag it through the mixtures in a few big figure-eight shapes. Don’t overdo the swirling or the two colours will just blend into a murky brown instead of staying in clear, pretty loops.
- Bake until springy: Slide the tin into the centre of the oven for 45 to 55 minutes until the top is golden and firm to the touch. Poke a skewer into the middle; if it comes out clean with no wet batter, the cake is done.
Let the cake sit in the tin for five minutes before moving it to a wire rack to finish cooling. This short rest helps the delicate sponge set so it doesn’t break apart while you’re trying to peel off the baking paper.
Notes
-
Don’t over-blend the mixture: As soon as the batter looks uniform and smooth, stop the machine immediately. If you keep it running too long, you’ll knock the air out of the self-raising flour and the cake will come out flat and tough.
Sieve the cocoa powder: Cocoa often has hard little lumps that won’t break down just by stirring. Passing it through a fine mesh sieve before adding it to the batter ensures the chocolate half of your cake is perfectly velvety.
Use room temperature eggs: Cold eggs can cause the softened butter to curdle and separate when you blend them together. Taking them out of the fridge an hour early helps the fat and liquid stay bonded for a better rise.
Keep the swirls large: It’s tempting to keep drawing patterns with your knife, but three or four quick passes are usually enough. The more you move the batter, the less the vanilla and chocolate will stand out from each other.
Check the oven seal: If your cake is taking much longer than 55 minutes, your oven might be losing heat. Make sure the door is shut tight and avoid opening it during the first half hour of baking to keep the temperature steady.
Weight your ingredients: Using a digital scale is much more accurate than using cups for a sponge like this. Even a few extra grams of flour can make the cake dry, so stick to the metric weights for the best result.