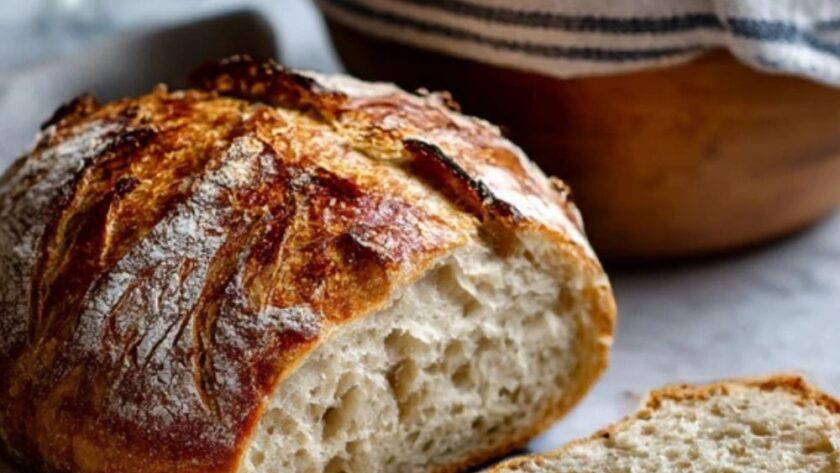
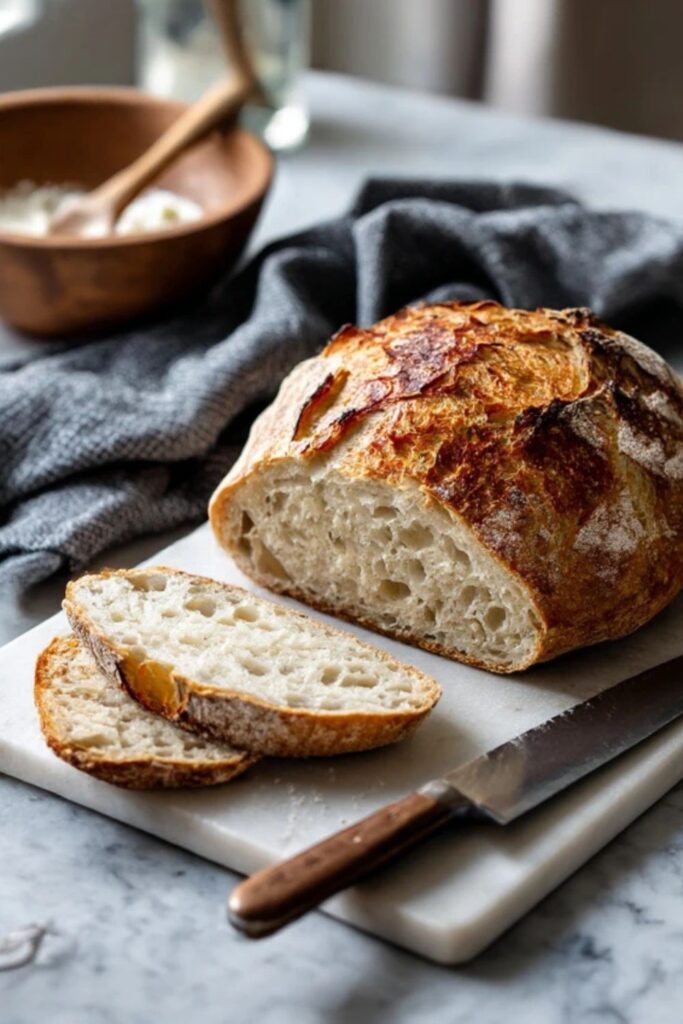
Alton Brown Sourdough Bread Recipe is a classic American bake that uses a wild yeast starter for deep flavor. This crusty loaf features a chewy center and a sharp tang from a long fermentation with bread flour and water.
The first time I made this, I rushed the rising process because I wanted toast by dinner. Now I always give the dough the full time it needs in the fridge to develop those tiny bubbles. If you try to bake it too soon, you’ll end up with a heavy brick that lacks that signature sour punch.
Alton Brown’s approach here is all about controlling the temperature and moisture inside your oven. Most recipes just tell you to throw the dough in, but this one uses a heavy pot to trap steam. This method makes the crust shatter when you bite into it instead of being soft and leathery.
Alton Brown Sourdough Bread Recipe Ingredients
For the Dough
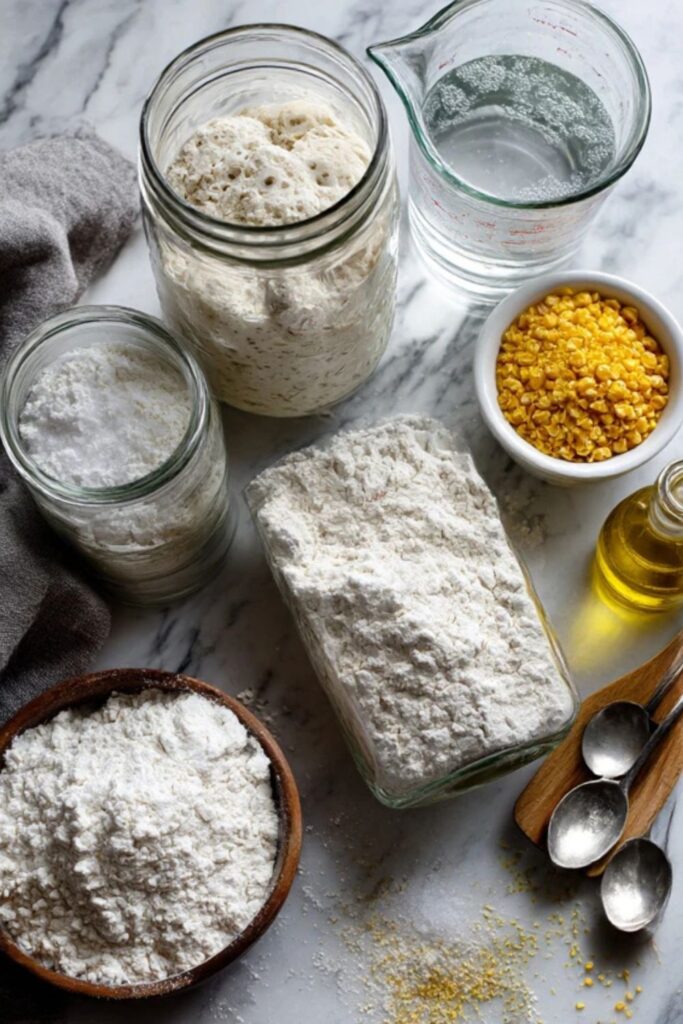
- 1 cup (225g) active sourdough starter
- 1 1/2 cups (355ml) filtered water, lukewarm
- 20 oz (565g) bread flour
- 2 1/2 tsp (15g) kosher salt
- 1 tsp (4g) granulated sugar
For the Pot
- 2 tbsp (16g) cornmeal
- 1 tbsp (15ml) vegetable oil
How To Make Alton Brown Sourdough Bread Recipe
1. Mix the base: Stir the starter and lukewarm water together in a large glass bowl until the mixture looks milky and mostly smooth. Add the sugar and salt next, whisking briefly to make sure they’re not just sitting at the bottom.
2. Add the flour: Dump the bread flour into the bowl and stir with a stiff spatula until a shaggy, messy ball forms. Don’t worry if it looks ugly or lumpy right now, as long as there’s no dry powder left at the bottom.
3. Start the first rise: Cover the bowl tightly with plastic wrap and let it sit on your counter for about an hour. This gives the flour time to soak up the water before you start the real work of kneading.
4. Knead the dough: Turn the mixture onto a clean surface and push it away from you with the palms of your hands, then fold it back. Do this for about ten minutes until the surface feels smooth and bounces back when you poke it.
If the dough sticks to your hands like glue, rub a tiny bit of flour on your palms but don’t dump extra on the table. Adding too much extra flour at this stage makes the finished bread dry and tough.
5. Bulk fermentation: Lightly oil a clean bowl and toss the dough ball inside to coat it. Cover it up and let it sit in a warm spot until it doubles in size, which usually takes about four to six hours.
6. Cold proof: Punch the dough down gently to let the air out and then put the cover back on. Stick the whole bowl in the fridge for at least twelve hours, or up to twenty-four, to let the flavor get stronger.
7. Shape the loaf: Take the cold dough out and pull the edges toward the center to create a tight, round ball. Place it on a piece of parchment paper, cover it with a towel, and let it come to room temperature for two hours.
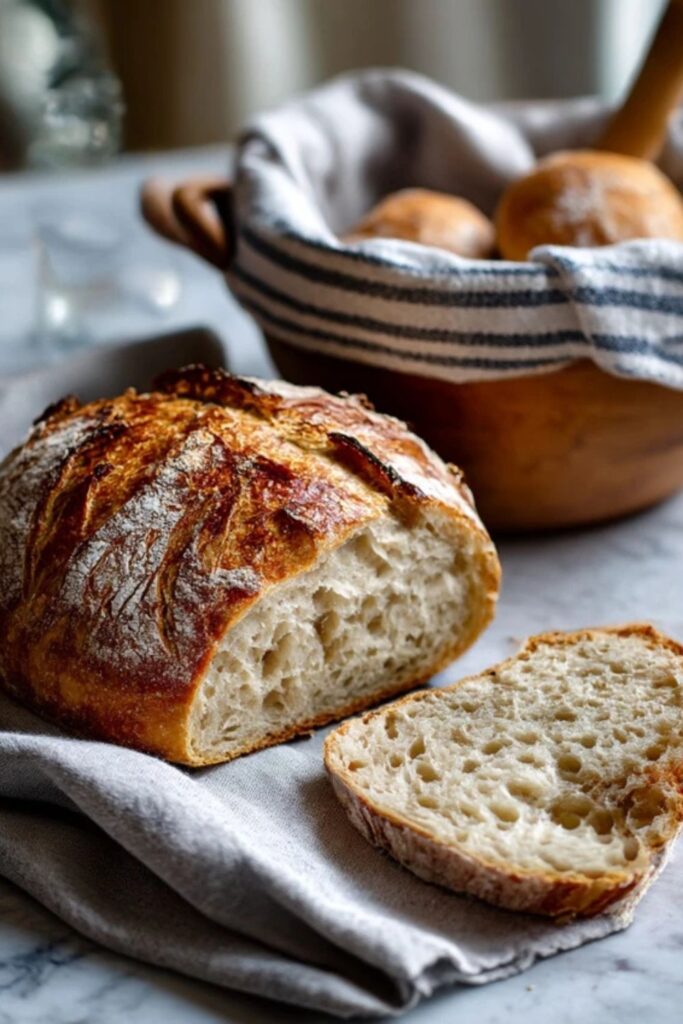
8. Preheat the oven: Place a large Dutch oven with its lid inside the oven and set the heat to 230°C (450°F). Let the pot get screaming hot for at least thirty minutes before you even think about grabbing the dough.
9. Score and bake: Dust the top of your loaf with a little flour and use a sharp knife to cut a shallow cross into the top. Carefully lower the dough and the parchment paper into the hot pot, put the lid on, and bake for twenty-five minutes.
Cutting the top isn’t just for looks. It gives the steam a specific place to escape so your loaf doesn’t explode out the side and lose its round shape.
10. Finish the crust: Take the lid off the pot and keep baking for another fifteen to twenty minutes. You’re looking for a deep, dark brown color that’s almost mahogany on the edges.
11. Cool completely: Lift the bread out of the pot and put it on a wire rack immediately. You have to wait at least an hour before slicing or the steam inside will turn the middle of the loaf gummy.

Recipe Tips
- Use filtered water. Chlorine in tap water can sometimes slow down the wild yeast in your starter. If your water smells like a swimming pool, let it sit out overnight or use a filter pitcher first.
- Check your starter. Drop a teaspoon of your active starter into a glass of water before you begin the dough. If it floats, it’s full of air and ready to bake, but if it sinks, you need to feed it and wait longer.
- Trust the fridge. The cold environment slows down the yeast but lets the bacteria create more lactic acid. This is how you get a loaf that actually tastes sour instead of just tasting like plain white bread.
- Watch the pot. A cast iron pot with a heavy lid is the best tool for this job because it holds onto heat. If your lid is loose, a lot of the steam will escape and you won’t get those characteristic bubbles on the crust.
- Measure by weight. Flour packs down differently every time you scoop it with a cup. Using a digital scale is the only way to make sure your dough isn’t too wet or too stiff for a good rise.
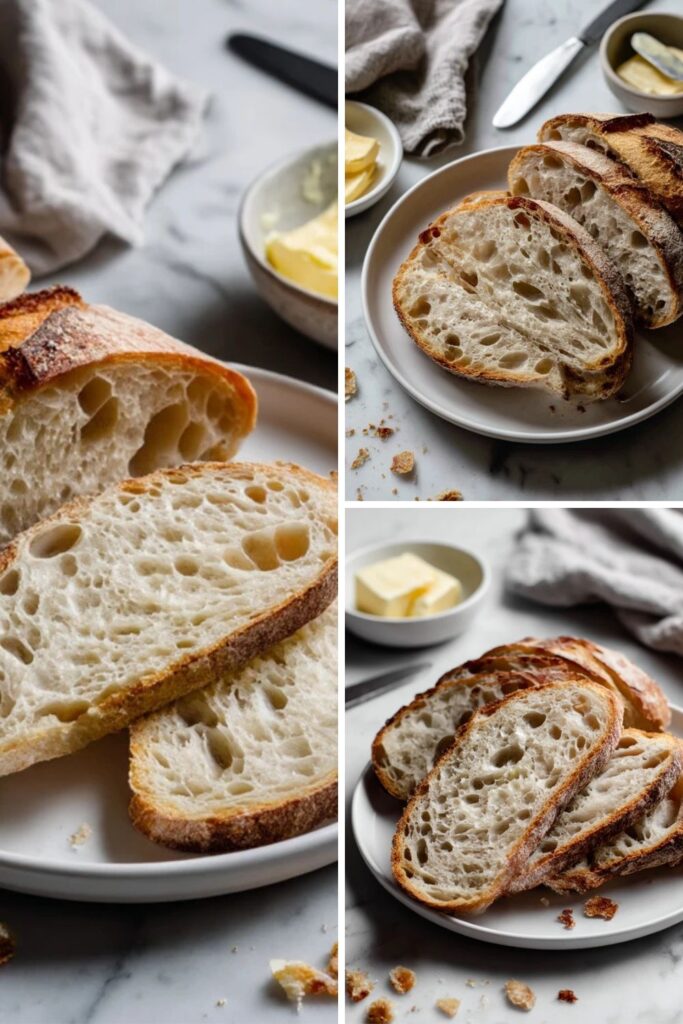
- Store it cut-side down. Once you’ve sliced into the loaf, keep it on a wooden board with the open side facing down. This keeps the air out of the soft middle while letting the crust stay crisp.
What To Serve With Sourdough Bread
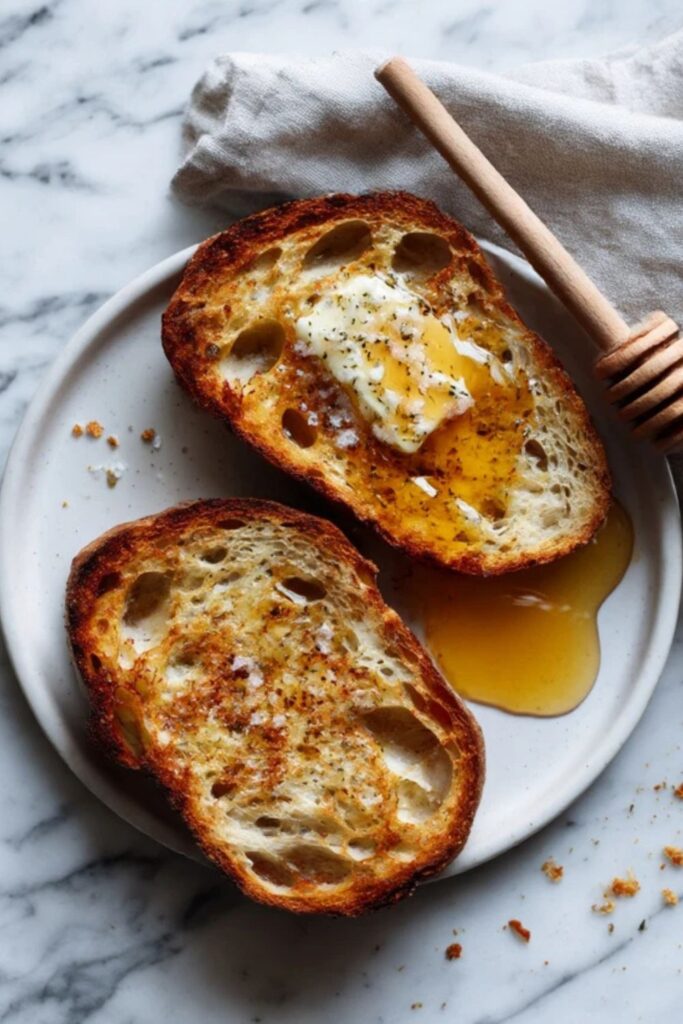
Thick slices of this bread are great when they’re toasted and topped with salted butter or a drizzle of honey. The tang of the dough works well with something sweet and creamy.
If you’re eating this for dinner, use it to scoop up beef stew or a bowl of tomato soup. It’s sturdy enough to hold onto heavy sauces without falling apart or getting soggy right away.
How To Store Sourdough Bread
- Fridge: Don’t put this bread in the fridge because the cold air will pull the moisture out and make it go stale fast. Keep it in a paper bag on the counter for up to three days for the best texture.
- Reheat: The best way to refresh a day-old slice is in the toaster or under a hot grill. If you have a whole unsliced loaf that’s gone a bit hard, splash the crust with water and put it in a 180°C (350°F) oven for five minutes.
- Freeze: Sourdough freezes better than almost any other bread. Slice it first, put pieces of parchment between the slices, and keep them in a freezer bag for up to two months.
Alton Brown Sourdough Bread Recipe Nutrition Facts
Per serving (1 of 12):
- Calories: 210 kcal
- Protein: 7g
- Fat: 1g
- Carbohydrates: 42g
- Sugar: 1g
- Sodium: 490mg
FAQs
Can I use all-purpose flour for Alton Brown Sourdough Bread Recipe?
No, you really need the extra protein in bread flour to create the structure for those big air holes. All-purpose flour will make a much flatter, denser loaf that won’t hold its shape in the pot.
How do I know if my starter is active enough for this?
The easiest way to tell is to see if it doubles in size within four hours of being fed. If it’s sluggish or only grows a little bit, your bread won’t rise properly during the bulk fermentation.
Can I bake Alton Brown Sourdough Bread Recipe on a flat sheet instead of a pot?
Yes, but you’ll need to put a pan of boiling water on the bottom rack of your oven to create steam. Without that moisture, the crust will set too early and prevent the bread from expanding as it heats up.
Why did my loaf come out flat and spread out?
This usually happens if the dough was too warm during the final rise or if you didn’t knead it enough to build strength. Make sure the dough feels tight and bouncy before you put it in the oven.
How long should I let the bread cool before cutting it?
You should wait at least sixty minutes. Cutting into hot bread lets the moisture escape as steam, which leaves the rest of the loaf dry and makes the current slice feel sticky.
Try More Recipes:
- Alton Brown Salmon Recipe
- Alton Brown Lemon Meringue Pie Recipe
- Alton Brown Enchilada Lasagna Recipe

Alton Brown Sourdough Bread Recipe
Description
Alton Brown Sourdough Bread Recipe is a classic American bake that uses a wild yeast starter for deep flavor. This crusty loaf features a chewy center and a sharp tang from a long fermentation with bread flour and water.
Ingredients
For the Dough
For the Pot
Instructions
-
Mix the base: Stir the starter and lukewarm water together in a large glass bowl until the mixture looks milky and mostly smooth. Add the sugar and salt next, whisking briefly to make sure they’re not just sitting at the bottom.
-
2. Add the flour: Dump the bread flour into the bowl and stir with a stiff spatula until a shaggy, messy ball forms. Don’t worry if it looks ugly or lumpy right now, as long as there’s no dry powder left at the bottom.
-
3. Start the first rise: Cover the bowl tightly with plastic wrap and let it sit on your counter for about an hour. This gives the flour time to soak up the water before you start the real work of kneading.
-
4. Knead the dough: Turn the mixture onto a clean surface and push it away from you with the palms of your hands, then fold it back. Do this for about ten minutes until the surface feels smooth and bounces back when you poke it.
If the dough sticks to your hands like glue, rub a tiny bit of flour on your palms but don’t dump extra on the table. Adding too much extra flour at this stage makes the finished bread dry and tough.
- 5. Bulk fermentation: Lightly oil a clean bowl and toss the dough ball inside to coat it. Cover it up and let it sit in a warm spot until it doubles in size, which usually takes about four to six hours.
-
6. Cold proof: Punch the dough down gently to let the air out and then put the cover back on. Stick the whole bowl in the fridge for at least twelve hours, or up to twenty-four, to let the flavor get stronger.
-
7. Shape the loaf: Take the cold dough out and pull the edges toward the center to create a tight, round ball. Place it on a piece of parchment paper, cover it with a towel, and let it come to room temperature for two hours.
-
8. Preheat the oven: Place a large Dutch oven with its lid inside the oven and set the heat to 230°C (450°F). Let the pot get screaming hot for at least thirty minutes before you even think about grabbing the dough.
-
9. Score and bake: Dust the top of your loaf with a little flour and use a sharp knife to cut a shallow cross into the top. Carefully lower the dough and the parchment paper into the hot pot, put the lid on, and bake for twenty-five minutes.
Cutting the top isn’t just for looks. It gives the steam a specific place to escape so your loaf doesn’t explode out the side and lose its round shape.
-
10. Finish the crust: Take the lid off the pot and keep baking for another fifteen to twenty minutes. You’re looking for a deep, dark brown color that’s almost mahogany on the edges.
- 11. Cool completely: Lift the bread out of the pot and put it on a wire rack immediately. You have to wait at least an hour before slicing or the steam inside will turn the middle of the loaf gummy.