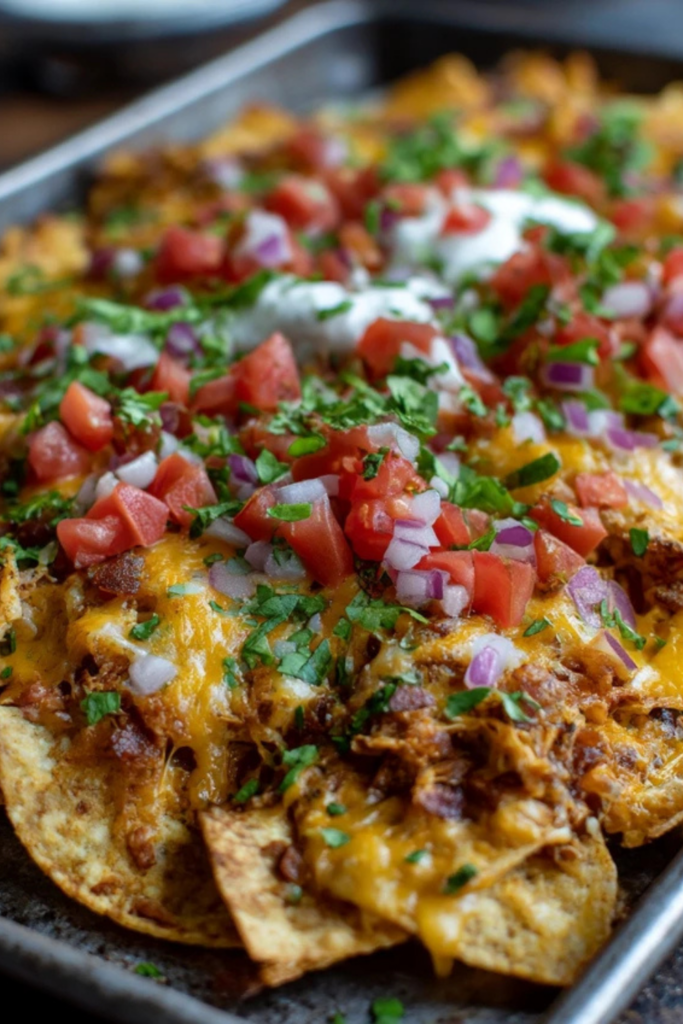
Pioneer Woman Chicken Nachos are a classic American appetizer that’s perfect for game day or a quick family dinner. These crispy chips are loaded with shredded chicken, black beans, and plenty of melted Monterey Jack cheese.
The first time I made these, I just dumped everything on at once and ended up with a soggy mess at the bottom. Now I always build them in layers so every single chip gets its fair share of cheese and toppings. That’s the difference between a sad pile of plain corn and a tray where every bite is a winner.
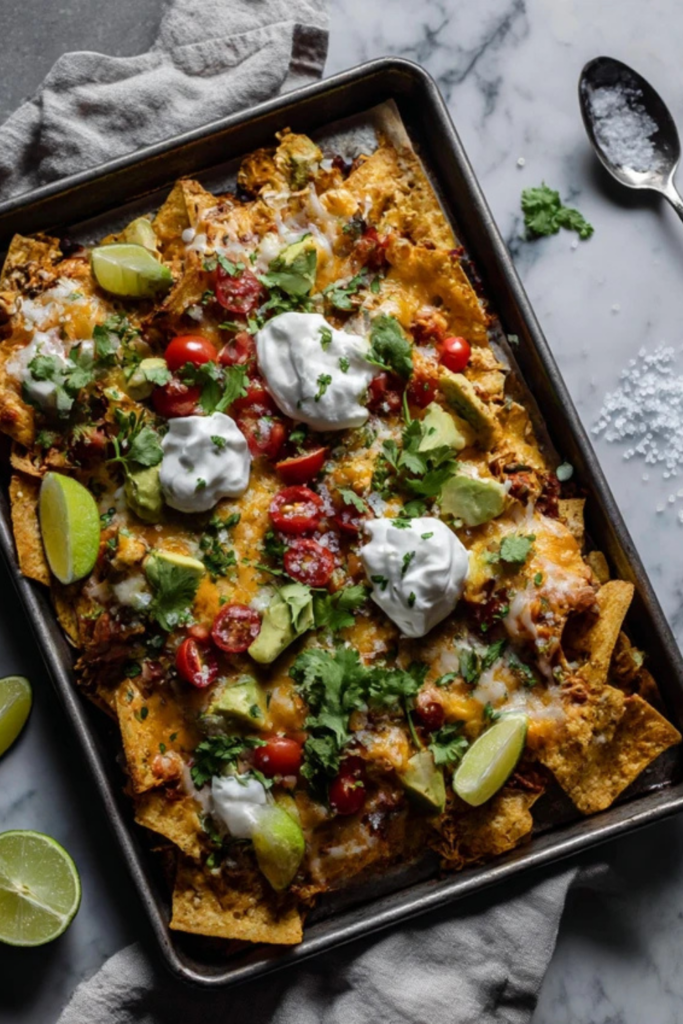
Ree’s approach here is all about using a sheet pan to get maximum coverage. Most recipes suggest a deep bowl, which hides the best bits under a mountain of dry chips. This one spreads everything out so the edges of the chicken get crispy while the cheese turns into a gooey blanket. It’s my favorite way to use up leftover rotisserie chicken when I’m too tired for a big production.
Pioneer Woman Chicken Nachos Ingredients
For the Nacho Base
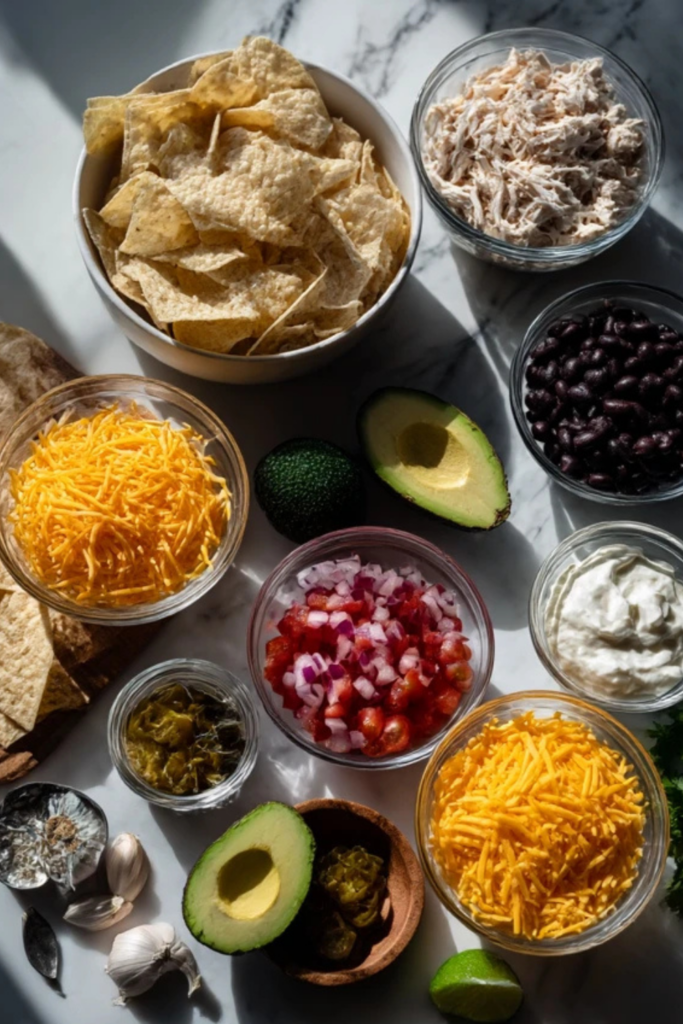
- 1 bag (13 oz/370g) thick restaurant-style tortilla chips
- 3 cups (420g) cooked chicken, shredded
- 2 cups (225g) Monterey Jack cheese, grated
- 2 cups (225g) cheddar cheese, grated
- 1 can (15 oz/425g) black beans, rinsed and drained
- 1 jar (4 oz/115g) pickled jalapeno slices
For the Toppings
- 2 whole avocados, pitted and diced
- 1/2 cup (120g) sour cream
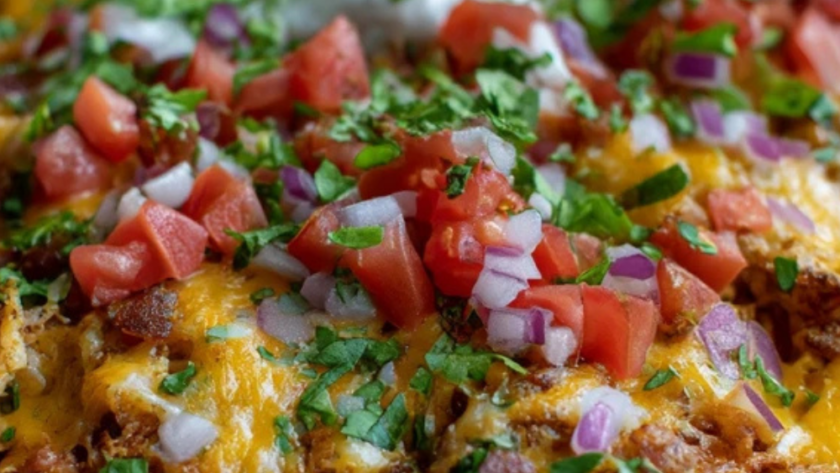
- 1/4 cup (10g) fresh cilantro, chopped
- 2 medium tomatoes, diced
- 1/2 small red onion, finely diced
- 2 limes, cut into wedges
How To Make Pioneer Woman Chicken Nachos
- 1. Heat the oven: Set your oven to 200°C (400°F). Line a large rimmed baking sheet with parchment paper or foil to make cleaning up easier later.
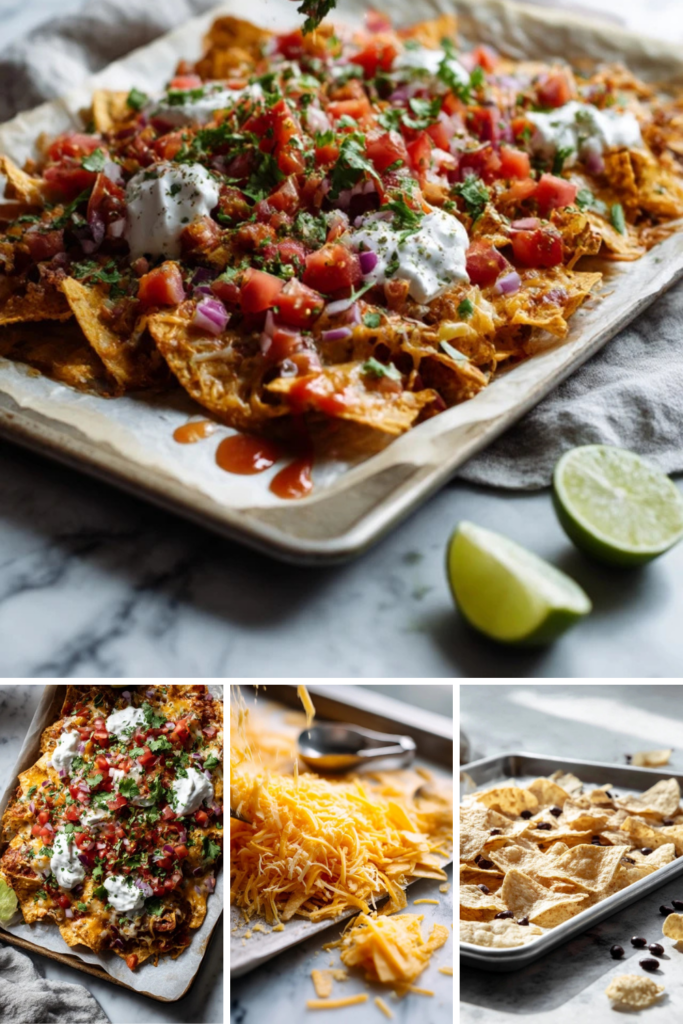
- 2. Layer the chips: Spread half the bag of tortilla chips across the tray in a single layer. Don’t worry if there are a few small gaps because the cheese will fill those in.
- 3. Add first layer of toppings: Sprinkle half the shredded chicken and half the black beans over the chips. Follow this with a generous handful of both types of cheese to act as the glue.
- 4. Repeat the layering: Place the remaining chips on top of the first layer and add the rest of the chicken and beans. Finish with the remaining cheese and the pickled jalapenos.
- Using two layers ensures you don’t end up with naked chips at the bottom of the pile. It takes an extra minute but it’s the only way to get the ratio of toppings right in every bite.
- 5. Bake the nachos: Slide the tray into the oven and bake for about 10 to 12 minutes. You want the cheese to be completely melted and bubbly, and the edges of the chips should look a bit toasted.
- Keep a close eye on the tray during the last few minutes of cooking. The chips can go from golden to burnt very fast once that cheese starts to sizzle.
- 6. Prep the fresh bits: While the tray is in the oven, chop your tomatoes, onion, and cilantro. Make sure you drain any excess liquid from the tomatoes so they don’t make the hot chips soft.
- 7. Garnish and serve: Take the tray out of the oven and immediately scatter the cold toppings over the hot cheese. Add the avocado, onion, tomato, and cilantro before finishing with dollops of sour cream and lime wedges.
Recipe Tips
- Grate your own cheese. Pre-shredded cheese in bags is coated in a powder that stops it from sticking together, which also stops it from melting smoothly. If you spend five minutes with a box grater, you’ll get a much better melt that stretches when you pull a chip away.
- Dry your beans thoroughly. After you rinse the black beans, let them sit in a sieve or pat them with a paper towel. If they’re still dripping when they hit the chips, the moisture will soak into the corn and make it tough instead of crunchy.
- Use thick chips. Thin, airy chips are great for salsa but they’ll snap under the weight of heavy chicken and beans. Look for bags labeled “restaurant style” or “thick-cut” so they can hold up during the baking process without breaking.
- Add cold toppings last. Don’t be tempted to put the fresh tomatoes or avocado in the oven. The heat makes the avocado turn bitter and the tomatoes release all their water, which ruins the texture of the melted cheese.
- Save time with rotisserie chicken. You don’t need to cook chicken specifically for this dish if you’re in a hurry. A store-bought roasted bird works perfectly and usually has more flavor than plain poached chicken breasts.
- Keep the lime wedges on the side. Some people love a lot of citrus while others don’t want any at all. Squeezing the lime over the whole tray right away can also make the chips lose their crunch if they sit for too long.
What To Serve With Chicken Nachos
A big bowl of chunky guacamole or a smoky roasted salsa works well here. You can also set out some extra pickled onions or a spicy hot sauce for anyone who wants more heat.
If you’re making this a full meal, a simple side of Mexican rice or some grilled corn on the cob is plenty. A cold soda or a light beer helps balance the weight of the cheese and beans.
How To Store Chicken Nachos
- Fridge: These don’t store well once they’re fully assembled because the chips get soft almost immediately. If you have leftovers, scrape the toppings into a container and throw the soggy chips away. It’ll stay fresh for about two days.
- Reheat: The best way to save them is to put the topping mixture in a pan and heat it through, then serve it over a fresh batch of crunchy chips. Using a microwave will just turn the whole thing into a rubbery mess that’s hard to chew.
- Freeze: You shouldn’t try to freeze finished nachos as the texture will be completely destroyed when it thaws. You can freeze the cooked shredded chicken on its own for up to three months if you want to prep ahead.

Pioneer Woman Chicken Nachos Nutrition Facts
Per serving (1 of 6):
- Calories: 540 kcal
- Protein: 32g
- Fat: 28g
- Carbohydrates: 42g
- Sugar: 3g
- Sodium: 890mg
FAQs
Can I make this Pioneer Woman Chicken Nachos recipe ahead of time?
No, you shouldn’t assemble them until right before you’re ready to eat. If the toppings sit on the chips for more than a few minutes before going into the oven, the base will get soft and lose its crunch.
What’s the best chicken to use for these nachos?
I find that leftover grilled chicken or a shredded rotisserie bird gives the best results. The meat needs to be fully cooked and seasoned before it goes onto the chips since the oven time is only long enough to melt the cheese.
Can I use a different type of cheese?
Yes, you can swap the Monterey Jack for Muenster or even a mild Provolone if that’s what you have. Just make sure it’s a good melting cheese and avoid anything too hard like aged Parmesan which won’t give you that gooey texture.
How do I stop the nachos from getting soggy?
The most important thing is to drain your beans and salsa very well so no extra liquid hits the chips. You should also wait to add any “wet” toppings like sour cream or fresh tomatoes until the tray is out of the oven.
Can I bake these on a regular dinner plate?
Yes, as long as your plates are oven-safe, you can make individual portions. Just keep in mind that the plate will be extremely hot when it comes out, so you’ll need to warn everyone before they start digging in.
Try More Pioneer Woman Recipes:
- Pioneer Woman Marinated Chicken Recipe
- Pioneer Woman Lemon Chicken Recipe
- Pioneer Woman Crockpot Ranch Chicken Recipe

Pioneer Woman Chicken Nachos Recipe
Description
Pioneer Woman Chicken Nachos are a classic American appetizer that’s perfect for game day or a quick family dinner. These crispy chips are loaded with shredded chicken, black beans, and plenty of melted Monterey Jack cheese.
Ingredients
For the Nacho Base
For the Toppings
Instructions
-
1. Heat the oven: Set your oven to 200°C (400°F). Line a large rimmed baking sheet with parchment paper or foil to make cleaning up easier later.
-
2. Layer the chips: Spread half the bag of tortilla chips across the tray in a single layer. Don’t worry if there are a few small gaps because the cheese will fill those in.
-
3. Add first layer of toppings: Sprinkle half the shredded chicken and half the black beans over the chips. Follow this with a generous handful of both types of cheese to act as the glue.
-
4. Repeat the layering: Place the remaining chips on top of the first layer and add the rest of the chicken and beans. Finish with the remaining cheese and the pickled jalapenos.
Using two layers ensures you don’t end up with naked chips at the bottom of the pile. It takes an extra minute but it’s the only way to get the ratio of toppings right in every bite.
-
5. Bake the nachos: Slide the tray into the oven and bake for about 10 to 12 minutes. You want the cheese to be completely melted and bubbly, and the edges of the chips should look a bit toasted.
Keep a close eye on the tray during the last few minutes of cooking. The chips can go from golden to burnt very fast once that cheese starts to sizzle.
-
6. Prep the fresh bits: While the tray is in the oven, chop your tomatoes, onion, and cilantro. Make sure you drain any excess liquid from the tomatoes so they don’t make the hot chips soft.
- 7. Garnish and serve: Take the tray out of the oven and immediately scatter the cold toppings over the hot cheese. Add the avocado, onion, tomato, and cilantro before finishing with dollops of sour cream and lime wedges.